

Vocal Health Strategies:
Mapping Out The Voice
Start your journey here and keep learning!
As long as you have a healthy speaking voice, you can learn to sing and strengthen what you have.
If you don’t have a healthy speaking voice, then most likely you have worked/are working with a speech therapist to help strengthen anatomy and neurology that make up the voice. As you’re voice gets better, then you can use these strategies below following your physician’s recommendations.

Step One:
Map out the voice
Before beginning exercises you should first figure out where your voice sits. It’s hard to work on something when you do not know where you are, right?
You may not know that your singing and speech all have pitch. This pitch can be found on instruments and the easiest one is the piano.
If you are a beginner, confused or are perhaps intimidated by music, don’t worry! These steps here are perfect for you and give you the guidelines to create the runway for success.
Luckily we have technology on our side. We can find our voice pitch by either using a guitar tuner or an mobile app on our devices. One free and easy-to-use app called Tuner Lite by Piascore (Click here for Apple Store Link) will be of great service to you. Another one out there is called Pitch Pro Tuner & Metronome (Click here for Apple Store Link) Of course, this is only just a few examples of many that exist.
Step 1: After downloading the app, get a writing utensil and paper and simply just start talking. Our speech, just like any other sound wave, carries a specific frequency that correlates to a specific key/note and octave found on the piano. You might notice that letters and numbers can and will change rapidly as you talk. That’s because our speech is dynamic. As we talk we naturally change key/pitch. Our goal for step one is to figure out where you normally talk (not sing) by finding a LETTER (note/key) and a NUMBER (octave) that’s associated.
If you have trouble identifying a clear letter and number, then speak slower and prolong how long it takes you to pronounce a word.
Make sure to write down a few letters and numbers down to get an idea of where you are. Don’t worry about getting all of them.
Step Two: Find your voice on the piano
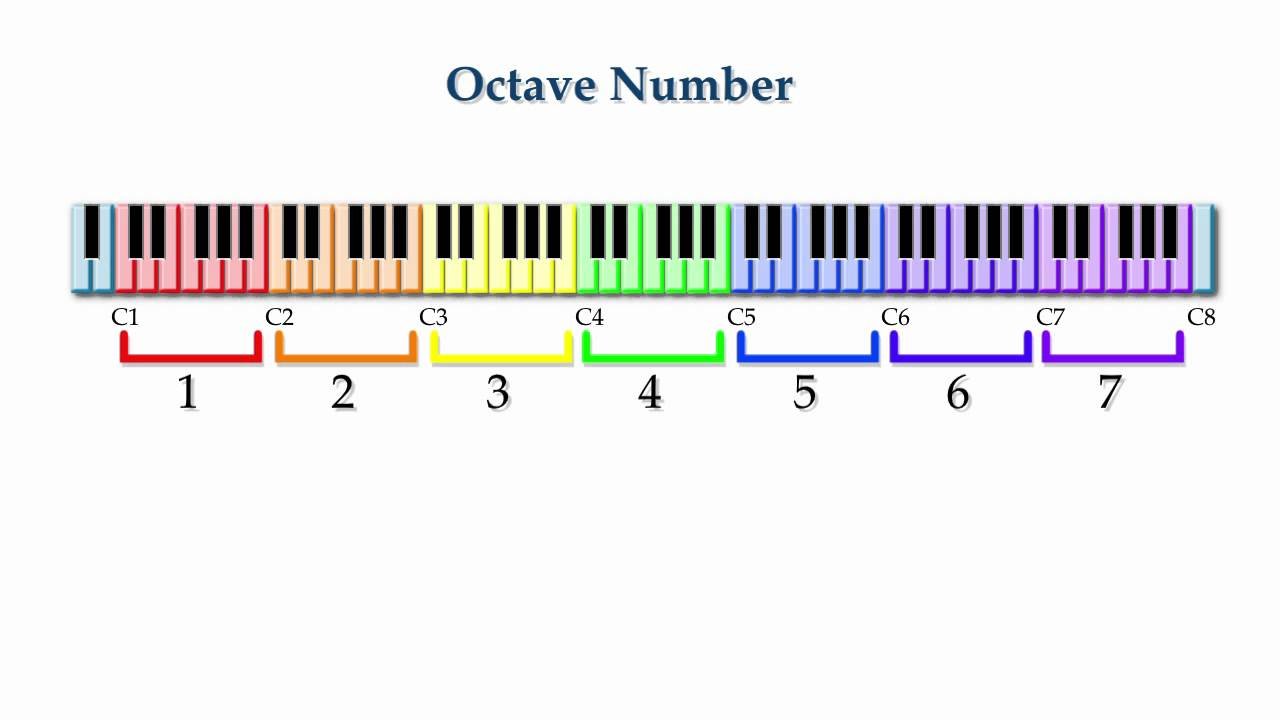
Take the notes you have written down and find them on the piano map below. The letter and number correlate with a specific part of the piano.
The order of notes on the piano are: C-D-E-F-G-A-B as you read left to right and then it returns back to C again on the next octave.
If you don’t have a piano or keyboard physically with you, then don’t worry!
There are online virtual pianos.
Here’s a few you can try:
-Online Pianist (Click here for link) This one might be the best, because you can zoom out to see the entire piano and have access to all octaves.
-Musicca (Click here for link) can be used as well, but the only caveat is that their piano has a limited octave. I did not see a way to lower or raise the octave range.
If you have any DAWs (Digital Audio Workstation) on your computer, then these have a piano roll that you can use. Examples of a DAW are: GarageBand, Ableton, Logic Pro or FL Studios.
If you have an iPad, then GarageBand should already be downloaded. If not, check the App Store.
If you’d like a video explanation on piano keys and octaves, then watch this Youtube video: (Click here for link) [Photo’s credit also comes from the same YT link source]
As long as you have your app out while you’re playing the piano, it will tell you exactly where you’re at. Just like it did for your voice. Use them together.
Now play the keys on the piano that correlate with the notes (letters) with the correct octave (numbers) that you wrote down. Lower octaves/frequencies will be on the left and higher ones on the right.
Step Three:
Sustain the pitch
Step three is about creating and sustaining a sound that is comfortable by using your speaking range.
Make sure you still have the Guitar/Voice Tuner out and pick a sound like Ma, Mi, Mo, Mu or Muh and hold it.
Watch, listen and feel what happens!
Is the key/note that you make stable and staying in one spot?
1) If you’re able to hold it with no problem, then try going up one note at a time and hold again. A good length of time to hold it could be around 5 seconds or so. Continue experimenting up and down the scale to see where you feel comfortable. Do not push or squeeze in order to accomplish higher notes. Find a Goldilock’s volume. We will talk more about this later, but for now simply do what feels comfortable without strain or tension.
Next thing to do is change the sound. So, if you started off with “Ma”, then try “Mo” or another one on the list.
Is the key/note switching as your try to hold it?
2) If your voice sounded or felt shaky, then don’t worry! We all start off at different places. If you’re finding trouble, it could be that either your volume may be too low or too high. Also, don’t think ‘singing’ just speak the sound and hold it.
No matter what, here’s what
you want to do next!
Simultaneously play the key on the piano as you sing the note that matches up with it. This is great for two reasons:
-Reenforce the correct key: You can hear the voice and piano key match (Hear the correct sound and produce it at the same time). You can play the piano note multiple times as your sustain the vocalized note. If you feel stable, then go up/down and play the note at the same time. Just play around with it.
-Understand the difference: if you find that you cannot sustain a note, then playing the note at the same time will help show you the difference and you can intuitively correct what you’re doing by lowering or raising the pitch. If you don’t get this right away, that’s okay! Especially if you have no prior vocal development. You might find that you were stable on some notes and some sounds (Ma/Mi/Mo/Mu/Muh) and others not so much.
Continue to work one note and one sound at a time. Record the notes/keys and sounds you hit and what they felt like with a journal/Google Doc/Notes App dedicated to your vocal progression.
Using an voice/instrument/guitar tuner will be carried with you throughout your entire journey!
That’s where we end today! We will continue learning more about the voice and what we can do to strengthen it.

